Плавающий бар для сайта на jQuery и CSS
- Aleksej
-
 Автор темы
- Не в сети
- Модератор
-

Less
Больше
15 года 1 мес. назад - 15 года 1 мес. назад #1
от Aleksej
Aleksej создал тему: Плавающий бар для сайта на jQuery и CSS
Вашему вниманию - перевод интересной статьи под названием "Floating social bar with jQuery and CSS".
Здравствуйте, друзья, сегодня мы собираемся показать вам эффектную реализацию плавающего бара с помощью JQuery и JavaScript, причем бар будет прокручиваться вместе с вашей web-страницей. Мы проведем Вас через несколько этапов - от создания файла PHP до настройке CSS, после чего вы сможете разместить этот причудливый плавающий бар на Вашем сайте. Созданная вами панель будет пригодна для размещения несколько элементов, как то - иконки социальных сетей, или иная информация. Некоторые другие хорошие примеры плавающих баров возможно найти на Meebo.com и Wibiya.com . Помните, что в качестве лишь некоторых видов использования вы можете дать этой интересной плавающей панели следующее применение:
Демо 1
Демо 2
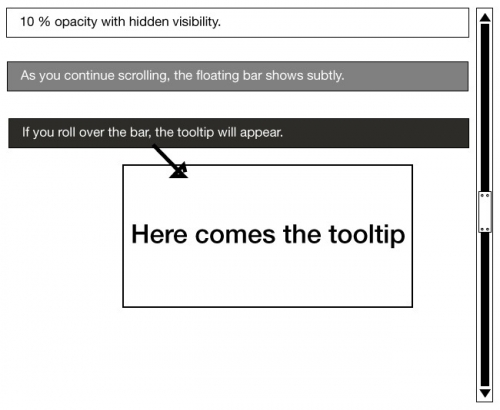
Итак, поехали. Создаем красивую плавающую панель с всплывающими подсказками, панель будет отображаться в верхней части страницы, причем плотность отображения панели будет постепенно, по мере прокрутки, повышаться (взгляните на второе демо), а также - будет отображена подсказка. Программная часть очень проста, и, чтобы сделать ее еще проще, мы объясним вам каждый шаг, который мы предпринимаем во время процесса.
Создаем HTML-код
Первое, что нам нужно сделать - это HTML. Для начала мы должны создать демо-страницу, а затем сохранить ее как demo.php, чтобы мы могли продолжить реализацию JQuery библиотеки.
Настройка CSS

Теперь - оставшийся HTML
И, наконец, магическая часть JS:
На этом - все, урок окончен. Мы потратили совсем немного времени и усилий, но сумели разработать привлекательную плавающую панель-бар. Если у вас при этом возникли какие-то проблемы, или же появились вопросы - отпишитесь в комментариях. Также не будет лишним, если вы поделитесь с нами вашими вариантами реализации панели. Теперь у вас есть возможность сделать красивую панель и эффективно разместить на ней полезные элементы.
Прочесть оригинал статьи
Здравствуйте, друзья, сегодня мы собираемся показать вам эффектную реализацию плавающего бара с помощью JQuery и JavaScript, причем бар будет прокручиваться вместе с вашей web-страницей. Мы проведем Вас через несколько этапов - от создания файла PHP до настройке CSS, после чего вы сможете разместить этот причудливый плавающий бар на Вашем сайте. Созданная вами панель будет пригодна для размещения несколько элементов, как то - иконки социальных сетей, или иная информация. Некоторые другие хорошие примеры плавающих баров возможно найти на Meebo.com и Wibiya.com . Помните, что в качестве лишь некоторых видов использования вы можете дать этой интересной плавающей панели следующее применение:
- Социальная информация
- Реклама
- Выделение важной информации (объявления, и т.д.)
- Контактная информация
- Опросы / Обратная связь
Демо 1
Демо 2
Итак, поехали. Создаем красивую плавающую панель с всплывающими подсказками, панель будет отображаться в верхней части страницы, причем плотность отображения панели будет постепенно, по мере прокрутки, повышаться (взгляните на второе демо), а также - будет отображена подсказка. Программная часть очень проста, и, чтобы сделать ее еще проще, мы объясним вам каждый шаг, который мы предпринимаем во время процесса.
Создаем HTML-код
Первое, что нам нужно сделать - это HTML. Для начала мы должны создать демо-страницу, а затем сохранить ее как demo.php, чтобы мы могли продолжить реализацию JQuery библиотеки.
Code:
<html xmlns="http://www.w3.org/1999/xhtml">
<head>
<meta http-equiv="Content-Type" content="text/html; charset=utf-8" />
<title>Floating bar by tutorialshock</title>
<script type="text/javascript" src="http://code.jquery.com/jquery-1.4.3.js"></script>
</head>
<body>
</body>
</html>
Настройка CSS
Code:
/*This is the main container, it's 100 % width so it can always expand horizontally to the totality of the screen.*/
div.scr_esp_down{
width:100%;
height:51px;
/* This is the 1 pixel background image that expands horizontally */
background: url(images/toolbar_make.jpg) repeat-x;
position:fixed;
top:0;
left:0;
/* We place it in front of the rest*/
z-index:9999;
/* We start the opacity from 10%*/
opacity:0.10;
filter:alpha(opacity=10);
/* We initialize the container as hidden, then we use this operator because we need to reserve the area that the floating bar is going to occupy once it’s shown*/
visibility:hidden;
}
/* This div contains the image with the floating bar’s information such as the icons, main message and more. We initialize it on the horizontal center of the page*/
div.scr_esp_down div{
width:100%;
height:51px;
background:url(images/IS_toolbar_img.jpg) no-repeat top center;
}
/*This class applies for the tooltip that is going to show on the 2nd demo’s roll over, on this case we use display none due to the fact that we no longer need to save space for this
image*/
img.img_animate{
display:none;
}
Теперь - оставшийся HTML
Code:
<div id="toolbar" align="center" class="scr_esp_down">
<div>
</div>
<img src="images/tooltip_2.jpg" border="0" class="img_animate" />
</div>
/* This div sets a fixed height to the page so the scroll gets visible */
<div style="height:3000px;">
</div>
И, наконец, магическая часть JS:
Code:
/* This function avoids having conflicts with other jQuery scripts, we suggest you to always use it.*/
var $jx= jQuery.noConflict();
/* On this validation we identify the browser to assign it the superior value of the vertical scroll, because you must remember that every browser plays by its own rules*/
Code:
$jx(window).scroll(function () {
if (whichBrs()=='chrome')
{
/* Identifies the superior position of the scroll in Chrome*/
$scroll_final=document.body.scrollTop;
}
if (whichBrs()=='Internet Explorer' || whichBrs()=='Firefox' )
{
/* Identifies the superior position of the scroll in Firefox and Internet Explorer*/
$scroll_final=document.documentElement.scrollTop;
}
/* If you need to add additional browsers then you have to research which function establishes the top position on each one of them*/
/* On this part we identify the main container*/
var toolbarid=document.getElementById('toolbar');
/* If the superior value of the scroll goes below 300, it means that the toolbar must not be shown and it will only be displayed once this value has been passed */
if ($scroll_final < 300)
{
toolbarid.style.visibility='hidden';
}
/* Here’s where the fade in animation begins*/
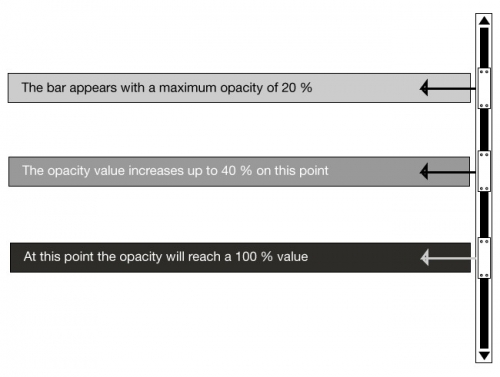
/* On this part we check the top value of the scroll and then we make 3 different opacity ranges to recreate the fade in effect. if you wish a softer effect you can simply add some
extra ranges*/
Code:
if ($scroll_final > 300 && $scroll_final <600 )
{
toolbarid.style.opacity='0.20';
toolbarid.style.filter='alpha(opacity=20)';
toolbarid.style.visibility='visible';
}
if ($scroll_final >600 && $scroll_final <1000 )
{
toolbarid.style.opacity='0.40';
toolbarid.style.filter='alpha(opacity=40)';
toolbarid.style.visibility='visible';
}
if ($scroll_final >=1000)
{
toolbarid.style.opacity='1.00';
toolbarid.style.filter='alpha(opacity=100)';
toolbarid.style.visibility='visible';
}
}
);
var $bt= jQuery.noConflict();
var time=0;
/*Coming next is the code that handles the tooltip*/
$bt(document).ready(function() {
/* We utilize the slideToggle function from jQuery to animate the tooltip, you can try another types of speeds and animation by visiting http://api.jquery.com/category/effects/ */
$bt("#toolbar").stop(true,true).mouseover(function () {
/* This part displays the tooltip*/
if (time==0)
{
$bt(".img_animate").slideToggle("slow");
time=1;
}
});
/* And this part hides the tooltip*/
$bt(".img_animate").click(function () {
if (time==1)
{
$bt(".img_animate").slideToggle("slow");
time=0;
}
});
});
/* Here’s where we make the tooltip to turn invisible once we click outside the tooltip’s image*/
$(document).bind('click', function(e){
var $clicked = $(e.target);
if (!($clicked.is('.img_animate') || $clicked.parents().is('.img_animate'))) {
$bt(".img_animate").stop(true, true);
time=0;
$bt(".img_animate").hide();
}
});
/* Identifies which browser is being utilized */
function whichBrs() {
var agt=navigator.userAgent.toLowerCase();
if (agt.indexOf("opera") != -1) return 'Opera';
if (agt.indexOf("staroffice") != -1) return 'Star Office';
if (agt.indexOf("webtv") != -1) return 'WebTV';
if (agt.indexOf("beonex") != -1) return 'Beonex';
if (agt.indexOf("chimera") != -1) return 'Chimera';
if (agt.indexOf("netpositive") != -1) return 'NetPositive';
if (agt.indexOf("phoenix") != -1) return 'Phoenix';
if (agt.indexOf("firefox") != -1) return 'Firefox';
if (agt.indexOf("chrome") != -1) return 'chrome';
if (agt.indexOf("safari") != -1) return 'Safari';
if (agt.indexOf("skipstone") != -1) return 'SkipStone';
if (agt.indexOf("msie") != -1) return 'Internet Explorer';
if (agt.indexOf("netscape") != -1) return 'Netscape';
if (agt.indexOf("mozilla/5.0") != -1) return 'Mozilla';
if (agt.indexOf('\/') != -1) {
if (agt.substr(0,agt.indexOf('\/')) != 'mozilla') {
return navigator.userAgent.substr(0,agt.indexOf('\/'));}
else return 'Netscape';} else if (agt.indexOf(' ') != -1)
return navigator.userAgent.substr(0,agt.indexOf(' '));
else return navigator.userAgent;
}
На этом - все, урок окончен. Мы потратили совсем немного времени и усилий, но сумели разработать привлекательную плавающую панель-бар. Если у вас при этом возникли какие-то проблемы, или же появились вопросы - отпишитесь в комментариях. Также не будет лишним, если вы поделитесь с нами вашими вариантами реализации панели. Теперь у вас есть возможность сделать красивую панель и эффективно разместить на ней полезные элементы.
Прочесть оригинал статьи
Последнее редактирование: 15 года 1 мес. назад пользователем Aleksej.
Пожалуйста Войти или Регистрация, чтобы присоединиться к беседе.